20.3 Recording Checks
To verify the client's behavior we use check nodes, which query certain states and properties of elements within the SUT. Also checks can be recorded.
-
ActionClick the "Record a check"
 button.
- Switch to the SUT window. When moving the mouse over the components you will notice a blue border indicating the current selection.
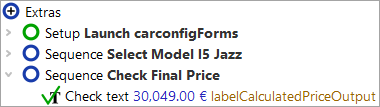
- Move the mouse over the value field of "Final price" and wait for the check border to appear.
- Right-click now on the value field. In the popup menu you are offered a choice of standard checks for a text field component.
- Select the first option "Text" for a check on the textual value of the field.
-
Stop the recording by using the
 Stop button.
NoteEnsure the check border is shown for a component before clicking to record a check. Otherwise the check may not be recored properly.
Again, the newly recorded sequence appears in the "Extras" section.
- ActionPlease rename the sequence to "Check final price"
- Expand it to see the check node.
- ActionFeel free to run this sequence, too, verifying it is working properly.
As the next step, we want to create a test case from the two sequences.